安裝作業系統
這次使用的是 CentOS 7.0.1406,安裝的 ISO 檔可至官網下載。一般只要用到 DVD 就足夠了,所以下載的是 CentOS-7.0-1406-x86_64-DVD.iso。如果頻寬有限可以考慮下載 CentOS-7.0-1406-x86_64-Minimal.iso,這是最精簡的版本,只安裝作業系統運作的必要元件。不過也由於是最精簡的版本,所以安裝完了之後如果有需要加裝額外的服務,需要再自行另外下載。為了分散流量所以下載時大多經由較近的載點來取得檔案,但不同的載點其實是有檔案被惡意竄改的可能,要確保所下載的檔案是與官網所發佈的一致,可以檢查檔案的驗證碼。驗證 ISO 檔的方法,各作業系統都會有一些差異。像在 OS X 裡是使用以下的指令:
This file contains bidirectional Unicode text that may be interpreted or compiled differently than what appears below. To review, open the file in an editor that reveals hidden Unicode characters.
Learn more about bidirectional Unicode characters
shasum -a 256 CentOS-7.0-1406-x86_64-DVD.iso |
如果是 DVD 的版本,在執行後出現的結果是「ee505335bcd4943ffc7e6e6e55e5aaa8da09710b6ceecda82a5619342f1d24d9」,代表所下載到的檔案內容與官網一致,沒有被修改過。驗證碼可以至官網的 Release Notes 中查詢。
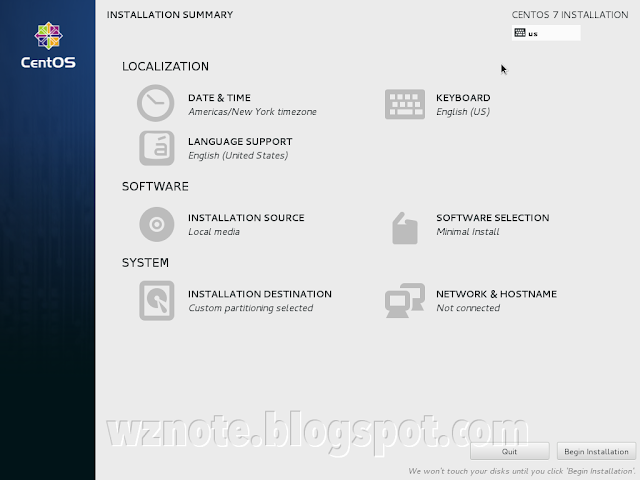
使用安裝檔開機之後,第一個畫面如下:
This file contains bidirectional Unicode text that may be interpreted or compiled differently than what appears below. To review, open the file in an editor that reveals hidden Unicode characters.
Learn more about bidirectional Unicode characters
yum -y groupinstall "Development Tools" |
選好了套件後,按下畫面左上方的【Done】回到 Installation Summary 畫面,再來設定【INSTALLATION DESTINATION】。
之所以規劃二個磁碟,主要是考量到讓系統和資料不會因為磁碟損毀而同生共死。另外一個考量是未來如果作業系統昇級或更換,可以不用特別把檔案複製出來,只要再將磁碟機掛回去就行了。這次示範時是使用 Virtual Box 來模擬,Data 所屬的那個磁碟機檔案可以先設為 Writethrough。所以在操作的過程中如果怕失誤要做 Snapshot,這個磁碟機不會被列在 Snapshot 裡,也就是一直維持最新的狀態。換句話說,不管用哪一個 Snapshot 還原回來,Data 依然是保持最後更新的內容。
把 Data 設為 Writethrough 的好處是可以避免讓磁碟機檔案佔用的空間爆增,因為 Data 本身就是用來保留不同版本的檔案內容,如果再經過 Snapshot 所佔用的空間可能會呈倍數成長。另外還可以避免因操作錯誤,要進行還原時,資料一併被還原導致要重新輸入的困擾。最後由於 Data 不會跟著 Snanpshot 的資料,所以同樣的資料可以被任意的重新掛在不同的虛擬機上做操作與研究。當然,由於 Data 不會被 Snapshot 所以一旦有資料誤輸入是無法透過 Snapshot 來還原,這是要特別注意的。
設定的方法是在 Virtual Box 的主畫面中執行 Virtual Media Manager,選擇要變更 Mode 的磁碟機檔案,按下【Modify】按鈕。接著會看到 Normal、Immutable、Writethrough、Shareable、Multi-attach 等不同 Mode 的選項,點選 Writethrough 後按下【OK】按鈕即可。
再回到安裝的程序,設定好磁碟規畫後,一樣是按下畫面左上方【Done】的按鈕,回到 Installation Summary 畫面。最後設定【NETWORK & HOSTNAME】,畫面如下:
安裝時預設是不會在開機後自動將網卡連上網路,所以要記得到在選定網卡後按下【Configure...】的按鈕,並把「Automatically connect to this network when it is available」的選項勾起來。如果在安裝時忘了勾選以上的選項,還可以在安裝完成後修改 /etc/sysconfig/network-scripts/ifcfg-* 檔案,* 號是把上方畫面中 Connection name 欄位的內容取代。在檔案中將 ONBOOT 更改為 yes 或是新增一行 ONBOOT=yes,修改後的檔案內容示範如下:
This file contains bidirectional Unicode text that may be interpreted or compiled differently than what appears below. To review, open the file in an editor that reveals hidden Unicode characters.
Learn more about bidirectional Unicode characters
service network restart |
如果網路設定在安裝完成之後出現問題,可以使用 ifconfig 的指令來檢視相關的資訊。但是在 Minimal Install 之下並沒有安裝這個工具,可以使用以下的指令來進行安裝:
This file contains bidirectional Unicode text that may be interpreted or compiled differently than what appears below. To review, open the file in an editor that reveals hidden Unicode characters.
Learn more about bidirectional Unicode characters
yum -y install net-tools |
如果不確定指令有沒有被安裝在系統中,可以先用以下二個指令其中一個來確認:
This file contains bidirectional Unicode text that may be interpreted or compiled differently than what appears below. To review, open the file in an editor that reveals hidden Unicode characters.
Learn more about bidirectional Unicode characters
which ifconfig | |
whereis ifconfig |
以下的指令則可以知道要安裝哪一個套件:
This file contains bidirectional Unicode text that may be interpreted or compiled differently than what appears below. To review, open the file in an editor that reveals hidden Unicode characters.
Learn more about bidirectional Unicode characters
yum provides ifconfig |
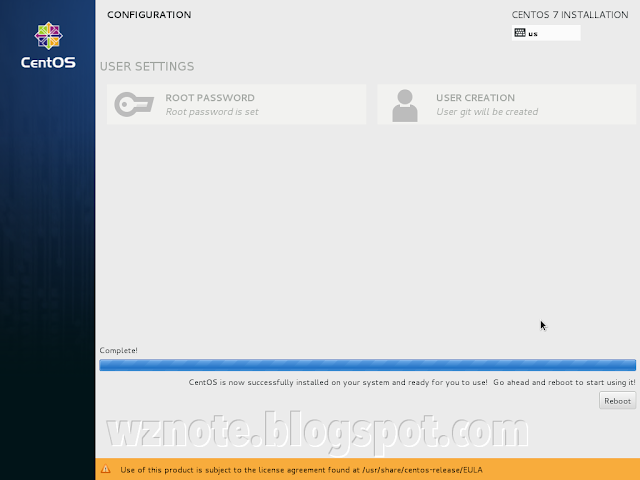
最後記得輸入在 DNS 註冊好的主機網域名稱,按下畫面左上方【Done】的按鈕,回到 Installation Summary 畫面。按下【Begin installation】按鈕之後會進入以下的 Configuration 畫面:
安裝 SSH
執行以下指令,安裝並啟動 SSH 的服務:
This file contains bidirectional Unicode text that may be interpreted or compiled differently than what appears below. To review, open the file in an editor that reveals hidden Unicode characters.
Learn more about bidirectional Unicode characters
yum -y install openssh* | |
service sshd start | |
systemctl enable sshd.service | |
systemctl status sshd.service |
systemctl enable 是用來讓 Service 在 boot 之後自動執行,systemctl status 可以檢查 Service 的狀態。SSH 安裝完成並啟動後可以用 Client 嘗試連線來進行驗證,第一次進行連線時會出現以下訊息:
client:~ $ ssh root@remotehost The authenticity of host ‘remotehost (192.168.1.1)' can't be established. RSA key fingerprint is 13:e4:9d:d4:12:85:88:b6:a3:5c:1a:fd:bf:46:9b:40. Are you sure you want to continue connecting (yes/no)?
輸入 yes 之後就可以使用密碼進行連線,並且會顯示以下方訊息,代表要連線的伺服器已經被加到清單之中,下次再連線就不會出現警告的訊息。
Warning: Permanently added 'remotehost' (RSA) to the list of known hosts. root@remotehost's password:
輸入安裝時設定的 root 密碼,密碼如果正確就可以完成連線。確定 SSH 運作正常後,就可以開始著手設定金鑰。首先要切斷剛才的 SSH 連線,回到 Client 端。在 Client 端中使用指令產生金鑰,每個作業系統的指令都有些差異,以下是 OS X 的指令範例:
This file contains bidirectional Unicode text that may be interpreted or compiled differently than what appears below. To review, open the file in an editor that reveals hidden Unicode characters.
Learn more about bidirectional Unicode characters
ssh-keygen -t rsa |
在產生的過程中會要求要輸入 passphrase,可以按下 enter 來跳過。很多的教學文章都是示範跳過 passphrase 的設定,如果只是試驗或練習那還無所謂,但如果是要透過 Internet 來進行 SSH 連線,以資安的角度並不建議跳過。SSH 金鑰使用的原理就像網銀的憑證一樣,網銀的憑證在讀取時也會被要求輸入被設定的密碼。這個密碼就是用來保護憑證檔裡的私鑰,作用相當於這裡的 passphrase。
金鑰檔案並不等於是私鑰,金鑰檔案是一個裝載公鑰或私鑰的容器。PKI 的設計重點是使用所謂的非對稱式加密來進行資訊的傳遞,傳遞前用一組配對的公鑰來進行加密,到達接收端時才用成對的私鑰來解密,而訊息也只有使用和公鑰配對的私鑰才解得開。所以私鑰在 PKI 的機制裡是很關鍵的一環,私鑰是必須要被保護的,否則就失去了 PKI 機制的用處。私鑰曝露了就相當於是大門的鑰匙被複制並且落在外人手上,這時就算有再堅固的大門、再複雜的門鎖都沒有用。
passphrase 和傳統的帳密登入的 password 在使用情境上還是有差別的,password 是會被透過網路傳送到遠端來讓對方認證,會有被中途攔截而洩露的風險。而 passphrase 則是用在本地的電腦、取得私鑰之用,所以並不是使用了金鑰卻還要使用密碼的多此一舉。同時,不要嫌安全設定麻煩,你覺得方便駭客也會覺得方便,萬一被駭倒楣的還是自己。就像有一句網路上的玩笑話,裝再好的鎖也沒有用,被侵入只是時間的問題,所以只要把鎖裝得比鄰居好就行了。
產生好的檔案會放在帳號所屬 Home 路徑的 .ssh 資料夾內,所以如果不確定是否已經產生過了,可以先到這個路徑下來確認金鑰產生的狀態。產生好了之後就可以透過 SSH 把公鑰檔上傳到 Server,公鑰檔的名稱以之前的指令為例是 id_rsa.pub。上傳的指令示範如下:
This file contains bidirectional Unicode text that may be interpreted or compiled differently than what appears below. To review, open the file in an editor that reveals hidden Unicode characters.
Learn more about bidirectional Unicode characters
scp ~/.ssh/id_rsa.pub root@remotehost:/tmp |
接著就是設定伺服器上的 SSH 環境,連線到 Server 執行以下的指令:
This file contains bidirectional Unicode text that may be interpreted or compiled differently than what appears below. To review, open the file in an editor that reveals hidden Unicode characters.
Learn more about bidirectional Unicode characters
cd | |
mkdir .ssh | |
cat /tmp/id_rsa.pub >> ~/.ssh/authorized_keys | |
chmod -R go= ~/.ssh |
要注意以上的指令是與帳號對應的,如果要使用 root 來連線,則要在 Server 上以 root 登入後執行。完成了之後就可以關閉 SSH 的密碼登入,只允許使用金鑰來做登入。設定的方式是修改 /etc/ssh/sshd_config 檔案的下述兩個參數:
PubkeyAuthentication yes PasswordAuthentication no
設定 Git 環境
如果在安裝 CentOS 時沒有選擇安裝 Development Tools 的套件組合,則要先執行以下的指令,以便安裝 Git 的套件:
This file contains bidirectional Unicode text that may be interpreted or compiled differently than what appears below. To review, open the file in an editor that reveals hidden Unicode characters.
Learn more about bidirectional Unicode characters
yum -y install git |
安裝好了 Git 套件,可以先把安裝 CentOS 就建立好的 git 帳號對應的 shell 更改為 git-shell,使連線進來的 Session 只能使用 Git 相關的指令,減少資安的風險。一般 git-shell 都是在 /usr/bin 下,如果不確定可以先使用 which git-shell 指令來查看實際安裝的路徑。
更改 shell 的方式是修改 /etc/passwd 檔案,git 的資訊應該位在檔案的最後一行,修改後的內容如下:
git:x:1000:1000::/home/git:/usr/bin/git-shell
接下來要設定讓 Client 端可以使用 git 帳號來存取 Server 上的 Repository,跟之前的步驟一樣,把上傳到 tmp 下的公鑰檔加到 git 帳號所屬的 authorized_keys 檔案裡:
This file contains bidirectional Unicode text that may be interpreted or compiled differently than what appears below. To review, open the file in an editor that reveals hidden Unicode characters.
Learn more about bidirectional Unicode characters
cd | |
mkdir .ssh | |
cat /tmp/id_rsa.pub >> ~/.ssh/authorized_keys | |
chmod -R go= ~/.ssh |
temp 下的 id_rsa.pub 已經沒有作用了,可以把它刪掉。再來就是依據實際的需求建立一到多個空的 Repository,指令示範如下:
This file contains bidirectional Unicode text that may be interpreted or compiled differently than what appears below. To review, open the file in an editor that reveals hidden Unicode characters.
Learn more about bidirectional Unicode characters
cd /srv/git | |
mkdir project.git | |
cd project.git | |
git --bare init | |
chown -hR git:git /opt/git/project.git |
要特別注意的事,由於 git 帳號被設定為使用 git-shell,所以以上的指令必須使用其他的帳號來進行,而且必須要有足夠的權限。而在空的 Repository 建立好了之後,要做擁有權的移轉,否則在 Push 時會出現以下的錯誤:
remote: error: insufficient permission for adding an object to repository database ./objects error: unpack failed: unpack-objects abnormal exit To git@remotehost:/srv/git/project.git ! [remote rejected] master -> master (unpacker error) error: failed to push some refs to 'git@remotehost:/srv/git/project.git'
回到 Cleint 端,建立本地的 Repository,但如果是第一次使用還沒進行初次的設定作業,要先執行以下的指令:
This file contains bidirectional Unicode text that may be interpreted or compiled differently than what appears below. To review, open the file in an editor that reveals hidden Unicode characters.
Learn more about bidirectional Unicode characters
git config --global user.email "you@example.com" | |
git config --global user.name "Your Name" |
接下來才是執行建立 Repository 的指令,其中 [path] 是 Repository 要建立的路徑:
This file contains bidirectional Unicode text that may be interpreted or compiled differently than what appears below. To review, open the file in an editor that reveals hidden Unicode characters.
Learn more about bidirectional Unicode characters
cd [path] | |
mkdir myproject | |
cd myproject | |
git init |
都準備好了之後,就可以做第一次的 commit 並 push 要 Server 上:
This file contains bidirectional Unicode text that may be interpreted or compiled differently than what appears below. To review, open the file in an editor that reveals hidden Unicode characters.
Learn more about bidirectional Unicode characters
git add . | |
git commit -m 'initial commit' | |
git remote add origin git@remotehost:/srv/git/project.git | |
git push origin master |
如果一切正常,就完成了在 CentOS 上架設 Git Server 的工作。
0 意見:
張貼留言